Jayne Who (Jayne Cobb/Doctor Who mashup) Costume
with Supersized Sonic Screwdriver
Jayne Who Costume
 I had pretty much all I needed to
cosplay Jayne Cobb,
except I was missing his cunning hat
(not shown in the pic of Jayne at right, but iconic nonetheless).
The T-shirt I was planning to use was this
"Blue Box" design,
which is a rather brilliant (in my opinion)
mashup of Firefly's Blue Sun design
(seen in pic of Jayne at right)
with Doctor Who,
and I think it looks almost perfect for Jayne if you
don't look too closely :-)
I had pretty much all I needed to
cosplay Jayne Cobb,
except I was missing his cunning hat
(not shown in the pic of Jayne at right, but iconic nonetheless).
The T-shirt I was planning to use was this
"Blue Box" design,
which is a rather brilliant (in my opinion)
mashup of Firefly's Blue Sun design
(seen in pic of Jayne at right)
with Doctor Who,
and I think it looks almost perfect for Jayne if you
don't look too closely :-)
But then I thought, my T-shirt is a mashup with
Doctor Who, so why don't I mash up my cosplay as well?
I could
wear the fez I wore with my
Doctor Who costume instead of the
normal Jayne hat.
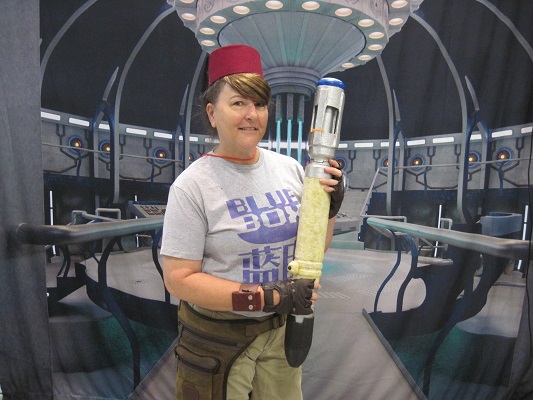
So, I tried it out at Florida Supercon in July 2016:
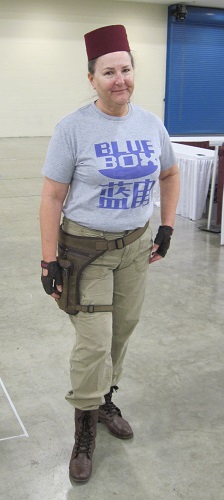 I'm pretty pleased with the result, although I do
think I probably should have included the bangs from my Doctor Who.
I'm pretty pleased with the result, although I do
think I probably should have included the bangs from my Doctor Who.
I know it's a pretty obscure mashup, so I was excited
when one guy at the Con came up to me, all enthusiastic because
he recognized what I was doing. It made my day!
He also helped me with some ideas on possible enhancements
in case I decide to do it again. He suggested I think
about my motivation, which is of course the
"play" part in cosplay.
I figured I'd want to go back in time to make sure
Firefly doesn't get cancelled.
Then he suggested I think about how I would do that,
and I figured because of the time-travel aspect,
I'd need a sonic screwdriver.
However, Jayne likes the BIG guns,
so the Jayne part of me would want it to be large.
But since I figure my chosen task would be difficult,
large would make sense...
Supersized Sonic Screwdriver
 So, I started to get enthusiastic about making a supersized sonic
screwdriver (which I would, of course, call "Vera").
I figured I could just get some good size cylindrical thing and paint
it appropriately, and maybe put one of those flat, round tap-lights on
the end.
I looked at stuff I had around the house that I might use for
the cylindrical part. I considered a pool noodle, but thought it was
really too narrow.
Then I found a heavy cardboard tube that I think was used as a mailer
for something... it seemed almost perfect.
So, I started to get enthusiastic about making a supersized sonic
screwdriver (which I would, of course, call "Vera").
I figured I could just get some good size cylindrical thing and paint
it appropriately, and maybe put one of those flat, round tap-lights on
the end.
I looked at stuff I had around the house that I might use for
the cylindrical part. I considered a pool noodle, but thought it was
really too narrow.
Then I found a heavy cardboard tube that I think was used as a mailer
for something... it seemed almost perfect.
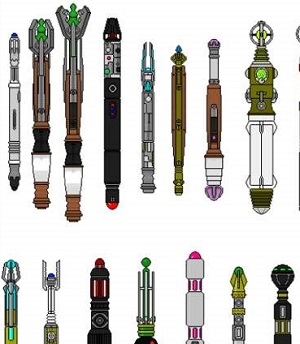
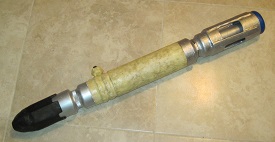
Then I had to do some research to see what the paint job was going
to look like, and I discovered that sonic screwdrivers were much more
complex than I had been thinking (some examples in pic at right).
Since the Doctor part of my cosplay was from the 11th Doctor,
I had planned to use his sonic
(the second two in the pic) as my model, but realized that
would be WAY more work than I was wanting to do.
So I went looking for one that was closer to a simple cylinder
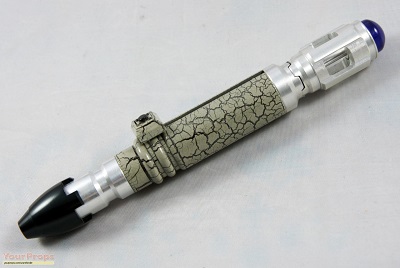
and the previous one, from the 9th/10th Doctor,
looked like it would work OK (see photo below)...
although it would require somewhat more than just a paint job.
 My first step was to take measurements of the sections of the
above pic, scale them up to the width of my cardboard tube,
and mark them on the tube. When I did that, the total length
came out rather shorter than I had expected, and I thought the thing was going
to look short and stumpy if it was scaled up exactly.
This would be the first of several times I'd have to consider
possible problems associated with scaling up.
I tried to think about what how it would work, logically, if someone were
actually building a real, large, sonic screwdriver type of device.
In this case, I figured it would need to be something that could
be held comfortably in the hands, and that being slightly, if disproportionately,
longer would work better for that.
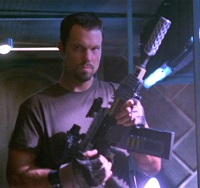
Also, I wanted it to be somewhat suggestive of Jayne Cobb's gun Vera,
as seen in the picture at right.
My first step was to take measurements of the sections of the
above pic, scale them up to the width of my cardboard tube,
and mark them on the tube. When I did that, the total length
came out rather shorter than I had expected, and I thought the thing was going
to look short and stumpy if it was scaled up exactly.
This would be the first of several times I'd have to consider
possible problems associated with scaling up.
I tried to think about what how it would work, logically, if someone were
actually building a real, large, sonic screwdriver type of device.
In this case, I figured it would need to be something that could
be held comfortably in the hands, and that being slightly, if disproportionately,
longer would work better for that.
Also, I wanted it to be somewhat suggestive of Jayne Cobb's gun Vera,
as seen in the picture at right.
As I was taking the measurements, I noticed there were basically
3 cylinder widths happening. I figured I'd use the cardboard
tube I had for the widest one, and the pool noodle might work for
the smallest one (the notches), but I still needed to find something
for the in-between width. Looking around at stuff I had around the house,
I found a plastic water bottle of the type made for carrying on a bicycle,
with a notch already in it to fit the bicycle's holder.
It fit almost perfectly inside the cardboard tube, and I had
2 of them, so I wouldn't even need to use the pool noodle.
For the black bottom piece of the sonic, I found
I could form the shape using the top part of a regular water bottle.
So, the plan was to assemble the basic forms,
then use papier mache' to smooth out the rough areas and give
a consistent surface for each section before painting.
I knew it was going to make the whole process easier if
I built it as several sub-assemblies before doing
the final assembly.
So below shows the basic forms for the 3 main sub-assemblies
(the bottom section (the end cap), the middle section, and
the top section), and how they go together.
The red parts are from the bike water bottles; the brownish parts
are the cardboard.


Top Sub-Assembly
The top sub-assembly required a bit of an extra build.
I noticed when I cut the openings in the cardboard tube for this
section that it looked awfully empty. Looking closer
at my reference picture I realized there was some kind of smaller
cylinder inside. For the supersize version, I was able to
use a toilet paper tube, held in place with the end caps from
the original mailing tube. That would be its own
sub-assembly in the top sub-assembly.
I found it interesting how I had to think ahead and plan
the building process.
I knew I could make some things easier for myself if
I did them in the right order.
For example, with this top section, I knew I couldn't build the
inner tube sub-assembly first and then insert it into the outer tube
because the end caps that held the toilet paper tube had to
go in from opposite ends.
And I knew the positioning of the red section of the top sub-assembly
would affect the positioning of the inner tube sub-assembly.
I also knew it would be easier to paint the inner tube
sub-assembly before it got
put inside the outer tube. Similarly, it would be easier to
paint the inside part of the outer tube without the
inner tube being in the way.
There was a funky detail in the notch area that meant the mache'
above and below the notch could, and probably should, be done separately.
But, I had to keep in mind that the top
metal part of the sonic needed to continue from the top
sub-assembly to the middle sub-assembly,
which meant I needed to glue those 2 sections together before I
did the below-the-notch mache'.
Also, in general, larger pieces would be more awkward to handle,
so it would be preferable to mache' and paint in smaller sections
when possible.
All this meant I had to do the top sub-assembly in the following order
(pic at right shows work on all 3 sub-assemblies,
somewhere in the middle of the process):

- Glue pieces of pool noodle to the end caps of the
inner tube assembly (these would help hold the inner tube
in the proper position within the outer tube). Then paint
the 3 pieces of the inner tube assembly. (I didn't feel a
need to papier-mache' the inner build, since its texture was
already smooth and consistent.)
- Mache' the inside and outside of the top cardboard outer tube
piece, but don't go all the way to the bottom. (Keep the red
plastic part of the top assembly separate for now.)
Paint the inside. (This step could be done concurrent with the above,
since they're separate pieces.)
- Insert the bottom end cap of the inner tube assembly into the
outer tube, followed by the red piece of the top assembly. Check
the positioning of the pieces and glue in place.
- Insert the inner tube and the other end cap into the outer
tube assembly and glue in place.
- Finish the mache' of the section above the notch.
- Once the middle sub-assembly is complete, insert the top assembly
into it and glue in place.
- Do the mache' below the notch, and paint.
Middle Sub-Assembly
 The middle sub-assembly wasn't as complex as the top one.
The bottom part is all "metal"; just a matter of paint
(since it was already one smooth piece of the same material,
there was not even a need to mache' it).
The top little bit was, logically, part of the top
sub-assembly and would be worked with that.
The middle plastic-looking section was the interesting part.
The middle sub-assembly wasn't as complex as the top one.
The bottom part is all "metal"; just a matter of paint
(since it was already one smooth piece of the same material,
there was not even a need to mache' it).
The top little bit was, logically, part of the top
sub-assembly and would be worked with that.
The middle plastic-looking section was the interesting part.
Looking at my reference pic, I noticed the middle part was
painted to look textured. I'd have to figure
out how to get that kind of effect when I got to the painting, but
first I needed to figure out if I should make it really
textured or just look that way.
Researching more on the Internet, I found this pic
(at left) showing variations of this sonic, as used
by the 9th, 10th, and even the 11th Doctor (for a while).
Interesting to see the color variation,
but still not clear whether the texture was real.
In the absence of a clear answer, I decided that this area
is where you'd hold the thing, so logically it should be
textured to provide a better grip.
I figured if I used textured paper towels instead of
my usual kraft paper for the papier mache', it ought to
produce a more textured result.
I discovered that the paper towels I was using were pretty flimsy,
and would start to fall apart when I soaked them in water,
which is my normal first step when I do mache'.
So I skipped that step and went straight to the
dipping them in glue.
Once I made that adjustment to my mache'
technique, it did seem to work.
I also needed to build a little stand out of coat-hanger wire
to hold the piece off the surface as I was working on it.
As I applied the mache', I noticed it was actually creating
an interesting sort of marbleized look as well as texture,
and considered maybe I wouldn't need to paint it at all.
After I finished the normal 2 layers of mache',
the surface still felt, well, flimsy.
I decided to add some strength by
painting on an extra layer of the wood glue
that I'd been using for the mache'.
(I later found out that some puppeteers add a last layer of glue
like that all the time, for protection, but I'd never done it
that way before.)
After that glue layer dried, it not only felt better but also
looked really good! The wood glue is kind of yellowish,
so the result resembled the rightmost 2 sonics in the
pic above left. I decided that was it;
I didn't need to paint it.
Bottom Sub-Assembly
The bottom sub-assembly was the easiest.
Compared to the pic of the sub-assemblies
up above,
there was a little bit more prep that needed to be done
to give it a better shape
for the mache'.
But once that was done and
the mache' was finished,
it was just a matter of painting it. I used primer first,
hoping to make it smoother, and it worked great.
I was pleasantly surprised that it only took 1 coat of the black
paint to cover the white primer.
Details and Final Assembly
There are some details of the build that weren't part
of the main sub-assemblies.
- Button:
I understood that the button-thing on the side of
the reference picture must be the thing that made the sonic work,
so my supersized sonic would also need something like it.
But as I looked at it in the first reference picture,
I figured it would be one of those things
that didn't scale well. On the normal size sonic, it's
basically a button for the thumb, but if you make it proportionately
larger, it would be much too big for a thumb; a button
for the thumb would have to be much smaller.
The picture showing the multiple variations
on this sonic showed a second smaller variation on the button that looked
more scaleable to a supersized version.
 So, I went looking
around the house to see what might work, and I found an odd thing:
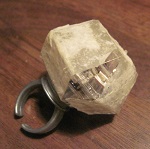
a plastic ring with a big giant "jewel" on it. The jewel
was clear but had some kind of electronics inside; I think it was
supposed to light up, to wear while out clubbing, but it
was no longer functional. Anyway, it seemed like an almost
perfect match, in scale, for the bigger button-thing.
(Pic at right, partly covered with mache')
When I compared it to the supersized sonic currently in process,
it looked quite reasonable. It looked like it would be worked with the whole
hand instead of just the thumb.
So, I went looking
around the house to see what might work, and I found an odd thing:
a plastic ring with a big giant "jewel" on it. The jewel
was clear but had some kind of electronics inside; I think it was
supposed to light up, to wear while out clubbing, but it
was no longer functional. Anyway, it seemed like an almost
perfect match, in scale, for the bigger button-thing.
(Pic at right, partly covered with mache')
When I compared it to the supersized sonic currently in process,
it looked quite reasonable. It looked like it would be worked with the whole
hand instead of just the thumb.
I covered the jewel with mache' to match the middle section of the sonic.
I also needed a black button, or similar, to go on top.
I considered and tried a few things, but none really seemed right to me.
Then I remembered I had an assorted bunch of googly eyes
amongst my puppet stuff.
I thought the black part of a googly eye might be perfect...
but no--when I took one out, it was really too flat. But then it
occurred to me that the googly eye itself was exactly the shape I was
looking for, and I had some in the right size. All I needed to do was
paint it black and glue it in place.
I was a bit concerned about a lack of surface area for a secure glue join
if just glued the finished jewel to the sonic,
so I drilled 2 holes into the main
tube, planning to insert the ring part to help it stay on.
Alas, when I did that, I thought it looked weird, so I removed the ring
part and just loaded up on the glue... Looked much better and seemed
plenty secure.
- Blue line:
I was a bit surprised when I first looked at
the picture of the variations
on this particular sonic (shown a ways above).
What was that blue line on the side?
It didn't show in the main reference picture I'd been using (shown
further above). What was I going to do with it in my
supersized sonic?
To answer that last part, I had to think about what the purpose
of the line was, i.e., what it was supposed to be. My best guess
is that it's a display, showing something about the settings for
the sonic. That location makes perfect sense for
a display on a normal-size sonic screwdriver, where you're holding
it out in front of you when you use it. But it doesn't make sense
for something you hold down low, like a big gun... you'd have to
look down to see it. I decided this was something that would not
scale. A supersize sonic, I figure, would have a completely
different interface
for whatever it was. Probably a holographic interface, like
some of the Doctor's other devices. So... I saw no need for any blue line
or equivalent.
- Light:
As I mentioned earlier, my first idea for this supersized sonic
was to put a flat, round tap style light on a cylinder.
Although the cylinder had gotten very fancified, the tap light still
seemed a reasonable choice. And I found one, close enough to the
perfect size, in the local dollar store--and it even came in
an appropriate shade of blue.
It wasn't precisely perfect, though, mainly because
the blue was only on the plastic housing, and the light cover
itself was actually white. I considered and tried several methods
to get the light itself to be blue, including nail polish and glaze,
but the results were all too streaky and messy.
I decided it would look better if I just stuck with the white.
Maybe I'll
come up with some brilliant alternative in the future, but for now
this is fine.
I had to give some extra thought to
attaching the tap light to the tube. For one thing, I needed to be
sure I could still change the batteries in the tap light once it was
attached. That turned out to be a minimal issue, what with the way the
tap light was made and the way it fit on the tube.
I just needed to be a little careful that I didn't mess it up
when I attached it.
The other concern was that there wasn't a lot of surface area for
the glue to make a good hold. I considered several ideas
for making it more secure, but none seemed likely to do much better
than just loading on some extra glue.
So, I put WAY more time than I was expecting into doing this, but it was
interesting and fun. Here's a pic of the result, first pic below.
The second pic is my original primary reference pic,
shown again here for comparison.
It was several months after I'd finished the sonic before I
got a chance to use it in my cosplay, at Supercon in July 2017:
(A few other minor changes compared to first time as Jayne Who:
wearing the bangs for the Who part, new gloves, and the
leather wristband that I made for my original
River Song costume.)
Return to main Cosplay page
 Return home